Prerequisites
- Myriad Playout or Myriad Cloud (v7.1 or higher)
- Myriad Anywhere Pro
- BR Web Player or Website or Mobile App
TABLE OF CONTENTS
- Listener Requests
Listener Requests
The Listener Request feature allows you to seamlessly share a curated list of Songs with your listeners via your Broadcast Radio Web Player and optional Website CMS and mobile apps.
Listeners can browse or search the list and request a song to be played. They can also attach a short message to accompany their requests.
Listener Requests flow into the studio workflow via Myriad Playout, for review and potential placement in the Log.
Placement options include:
- Automated* Placement – Requests are automatically approved and placed into the Log, in turn order, based on ‘replaceable’ positions in Clocks.
- Semi-Automated Placement – Requests have to be approved by a human before they are automatically positioned, in turn order, into the next replaceable position as determined in the Clocks.
- Manual Placement – Requests can be manually dragged or inserted into the Log at any point.
*Subject to local compliancy rules and restrictions.
In all cases, once Listener Request has been placed in the Log, the request is considered fulfilled.
In order to enable this feature, you will need the follow prerequisites:
- Myriad Playout 7 or Myriad Cloud 7
- Myriad Anywhere Pro or Myriad Cloud Standard (or higher)
- BR Web Player (included with streaming)
- Optional – BR Web CMS / BR Mobile Apps
Setting Up & Testing Listener Requests
The first step is to configure the curated list of Songs you want to offer and make them visible to your listeners so they can start to submit Listener Requests.
- Contact your Broadcast Radio account manager to ensure Listener Requests are enabled in your Station Enabler and Broadcast.Radio portal. You will also need Remote Edit Server running at your station and a Myriad Anywhere Pro subscription setup.
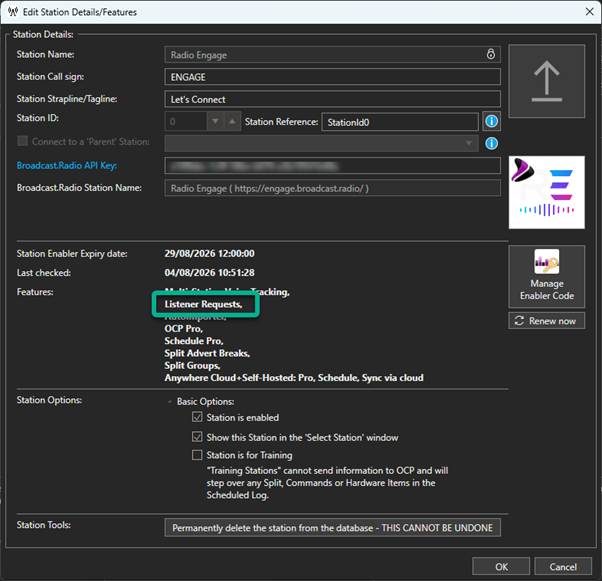
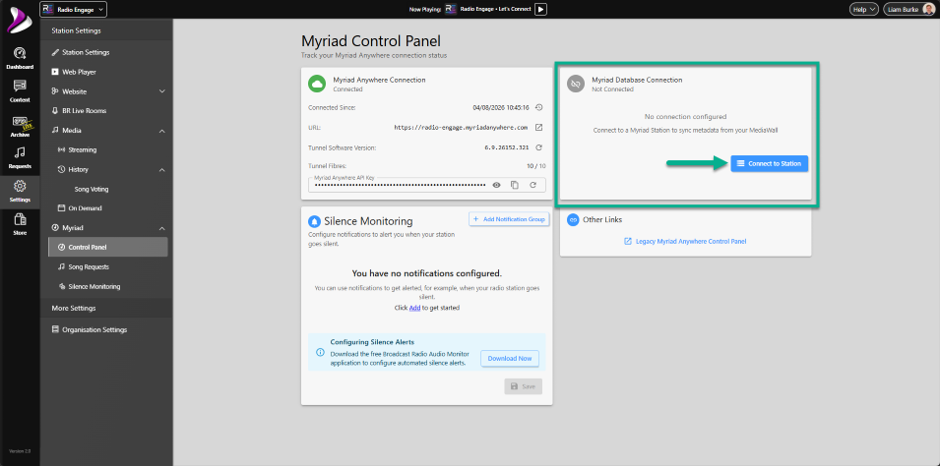
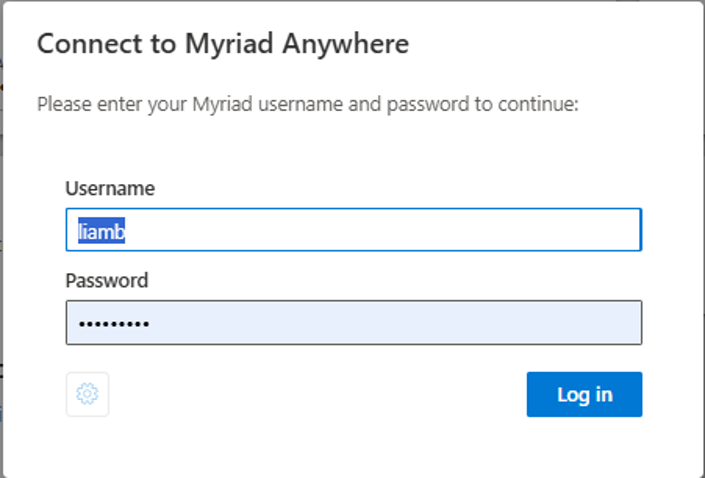
These prerequisites will be automatically setup for Myriad Cloud Standard, Pro and Advanced customers. - In your Broadcast.Radio platform, go to Settings > Myriad > Control Panel, click on the Connect to Station button and enter valid login credentials for Myriad Anywhere.
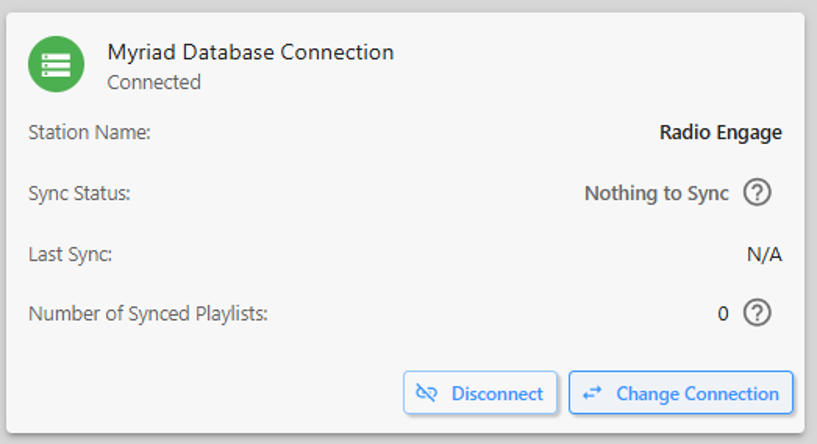
- Once the connection is established, the panel will update to reflect the connection status. This connection allows the B.R platform to synchronise a list of available Songs to offer in the Listener Request section.
- Next head to the Settings > Myriad > Listener Requests section in the Broadcast.Radio portal. This allows you to setup which Songs can be requested by the listeners.
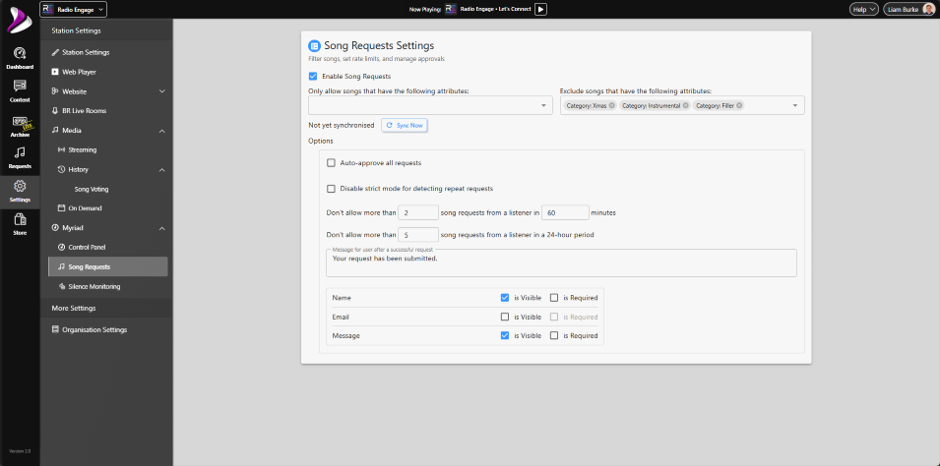
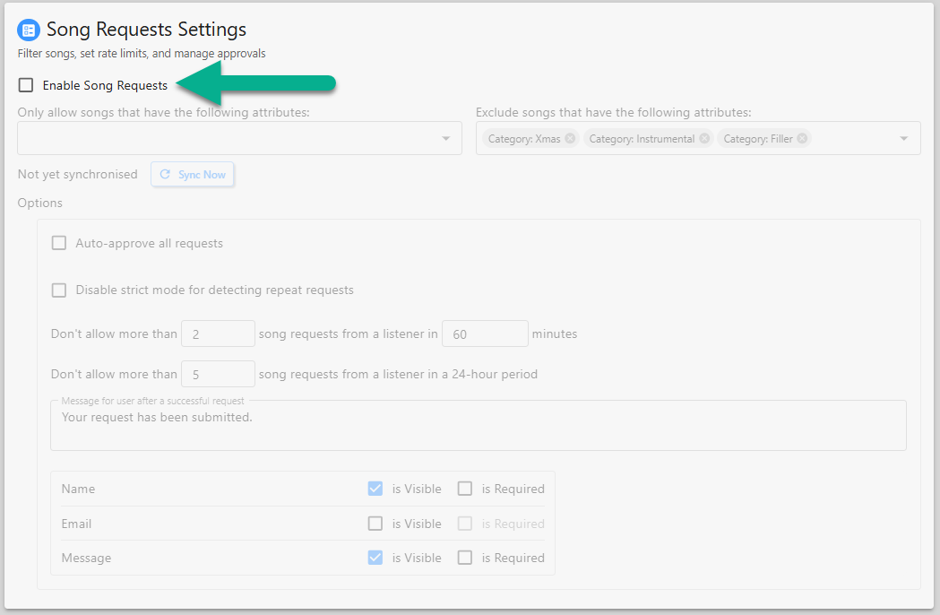
- Tick the Enable Listener Requests option.
- You can choose to only include Songs that have selected Categories and Attributes or Exclude Songs that have selected Categories and Attributes, or combine the two.
You have access to all configured Song Categories and Attributes on your Station.
Simply use the drop-downs to select one or more Categories and Attributes to either pick from, or exclude.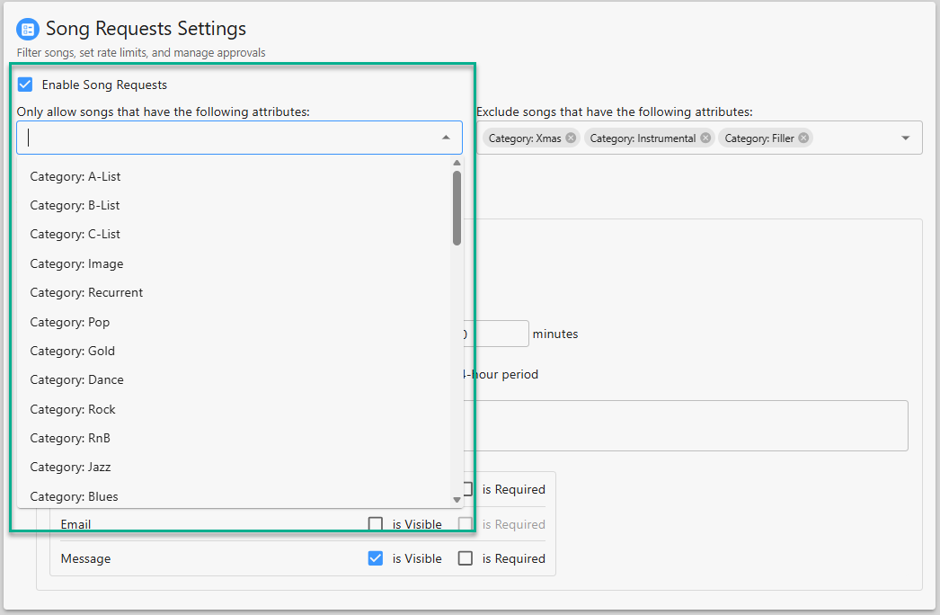
You can use any Attribute to populate or exclude content from the list of requestable Songs.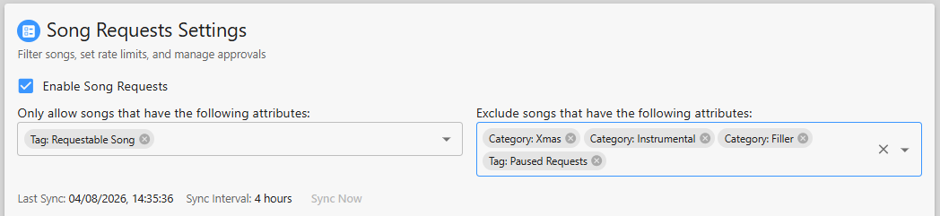
In the example above, all Songs with the Requestable Songs Tag will be included, but Songs from the Xmas, Instrumental or Filler Categories will be excluded. The list will also exclude any Songs with the Paused Request Tag added.
Tip: Myriad Schedule Pro customers have access to the Future Moves feature which allows for Categories and Attributes to automatically be added or removed after a set time or number of plays. This means that Songs that are requested regularly could be ‘rested’ from the Request List by adding the Pause Request Tag with a Future Move set to remove that Tag after a certain date or number of times played. - The Sync section shows the last time the Category / Attributes / Song list has been updated in Broadcast.Radio.
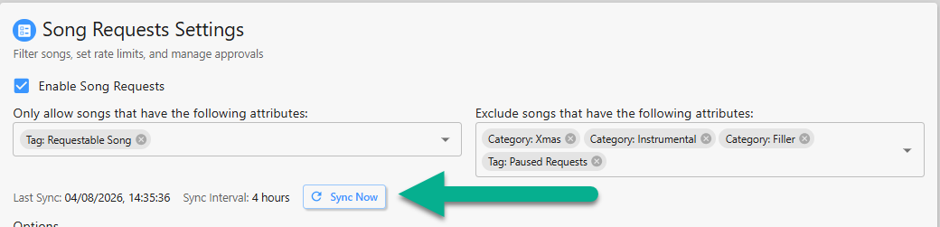
This process typically happens every four hours by default but you can manually trigger a synchronisation by clicking on the Sync Now button.
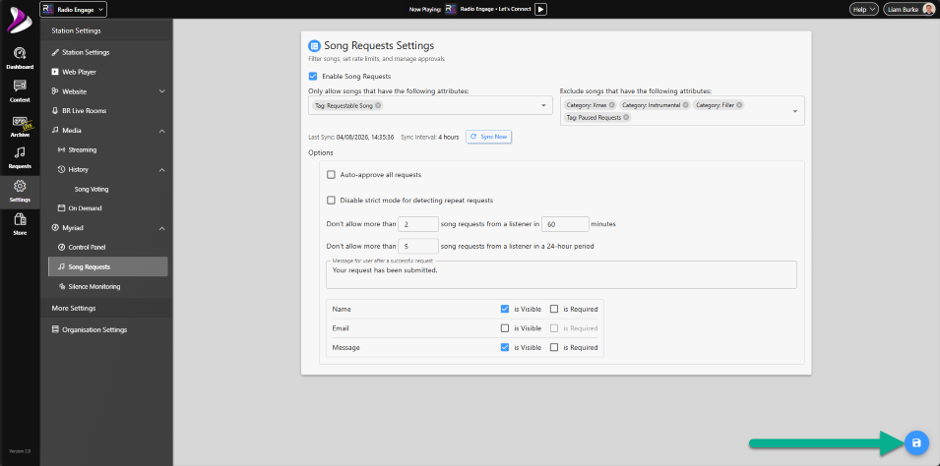
Please note that the Sync Now button is disabled while editing settings, it will re-enable once you have clicked on the Save button in the bottom right-hand corner.
N.B. This is only synchronising the list of available Songs and the Categories / Attributes Requests are sent to the Studio Myriad Playout system continuously. - The Options section allows you to set additional options for the Song Request Settings.
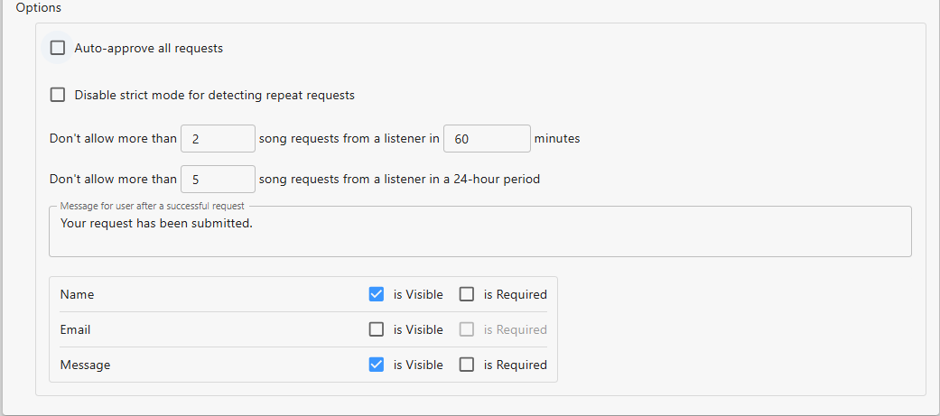
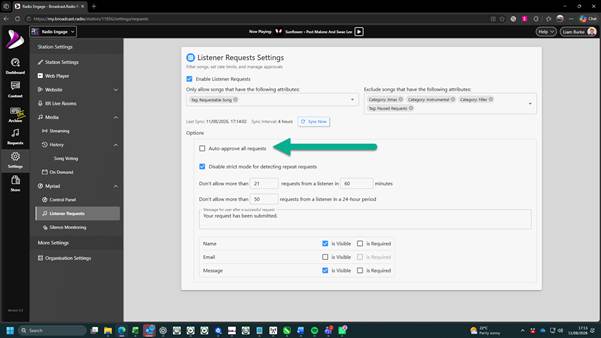
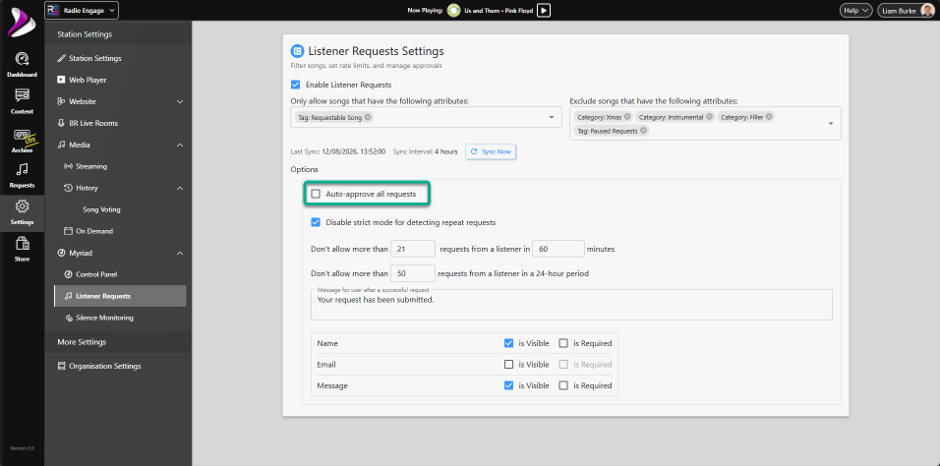
- Auto-approve all requests – Requests will automatically be approved and assigned to the next ‘requestable’ position in the Log.
- Disable strict mode for detecting repeat requests – By default, the platform will detect and reject abnormally frequent or repeating requests. This option allows you to disable the restrictions.
- Don’t allow more than X Listener Requests from a listener in X minutes - This option is designed to stop a listener from continually making requests.
- Don’t allow more than X Listener Requests from a listener in a 24 hour period - This allows you to set a daily limit on requests from a single listener.
- Message for users after a successful request - You can customise the message after a request submission is made.
- Name Options – Set whether the Name field is enabled on the Request Submission form and whether it is required.
- Email Options – Set whether the Email field is enabled on the Request Submission form and whether it is required.
- Name Message – Set whether the Name field is enabled on the Request Submission form and whether it is required.
- Once you have finished configuring your Song Request Settings, click on the Save button to save the changes.
- Now that the Song Request Settings are complete, the next step is to enable the Listener Requests in your Web player.
In Broadcast.Radio, click on Settings > Web Player.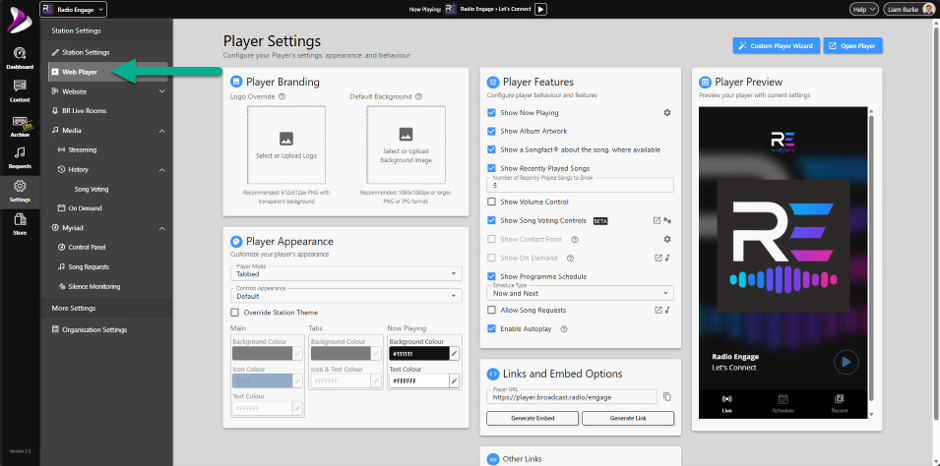
- In the Player Features section, tick the Allow Listener Requests option.
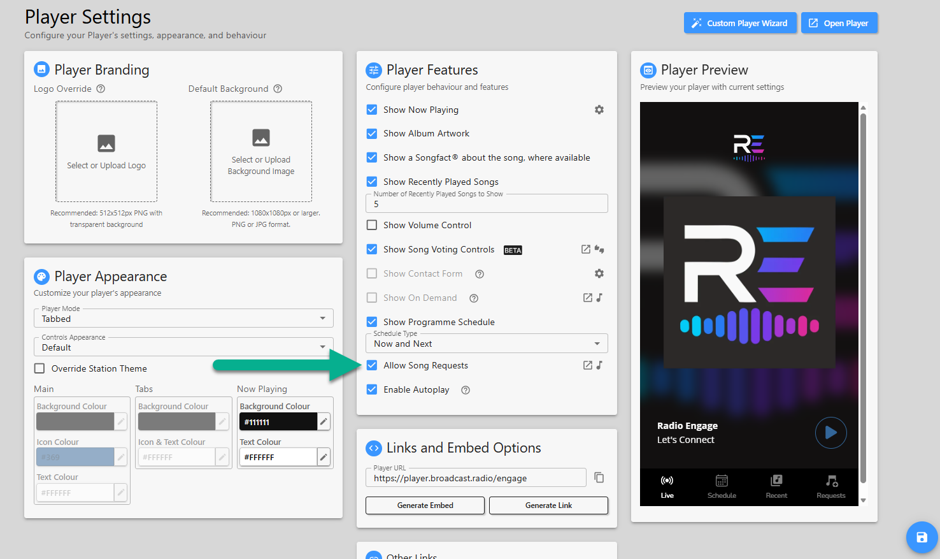
This will enable the Requests Tab on your Web Player.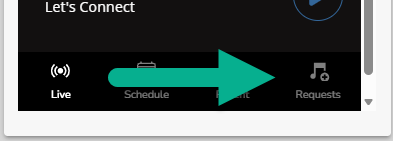
When a listener clicks on this, they will see the Request A Song page which allows them to search for a Song Title or Artist and send the request to the station.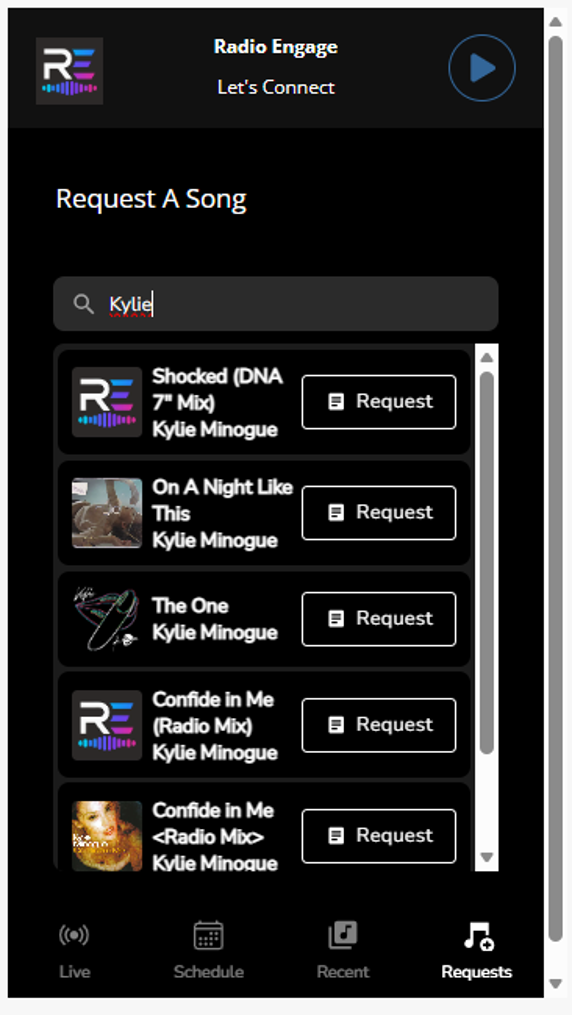
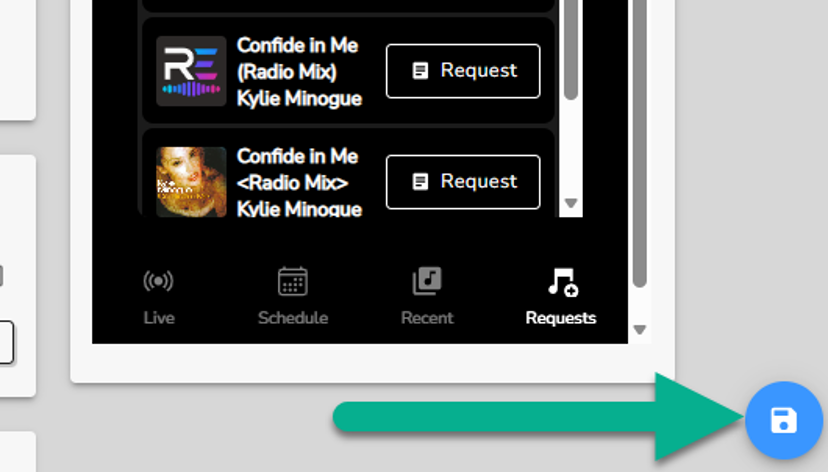
- Click on the Save button in the bottom right, to save the changes to your Web player.
- Now the Requests tab is enabled in the Web Player, we can test the workflow that the listener will go through to request a Song. Click on the Open Player button in the top right of the Web player window.
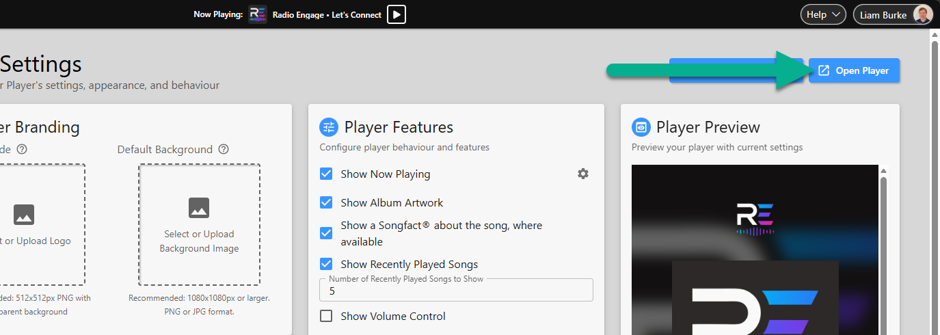
- Your Web Player will open in a new web browser tab.
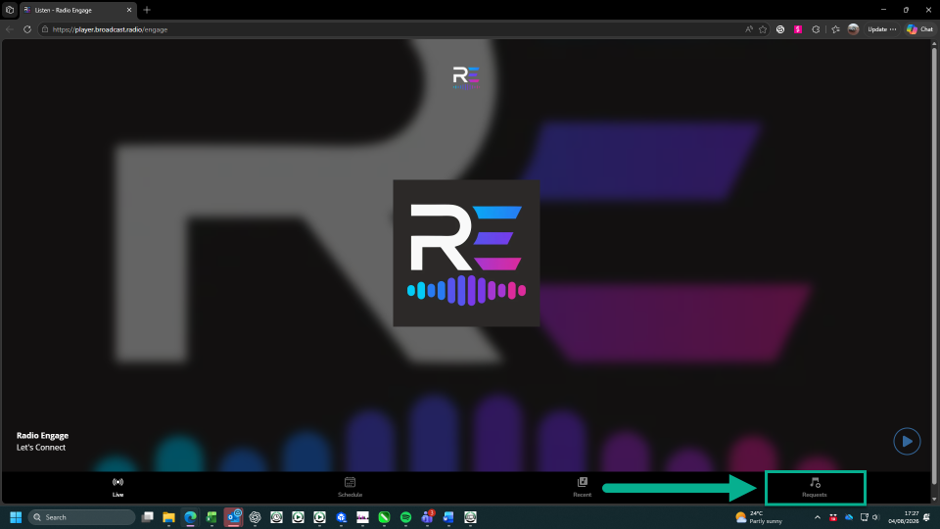
Click on the Requests tab to switch to the Request A Song tab. - Type an Artist name or Song Title into the search box. The results are automatically listed below.
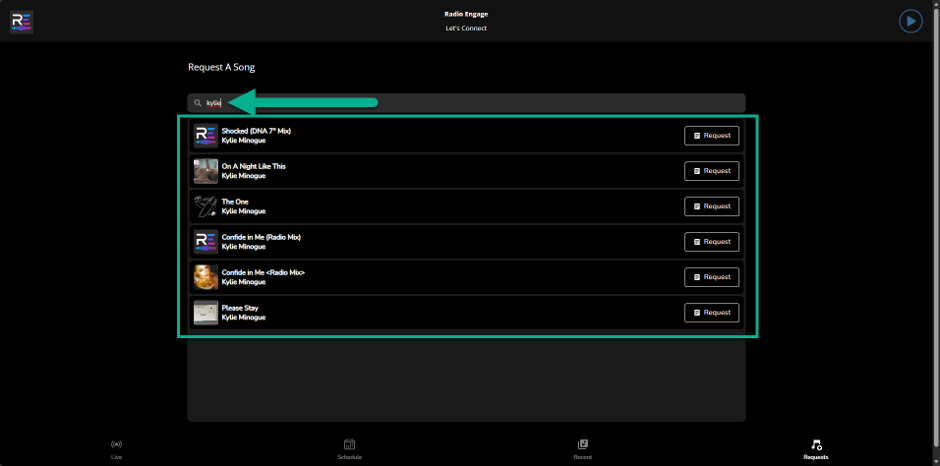
- Scroll through the results until you see the Song you want to request, then click on the Request button.
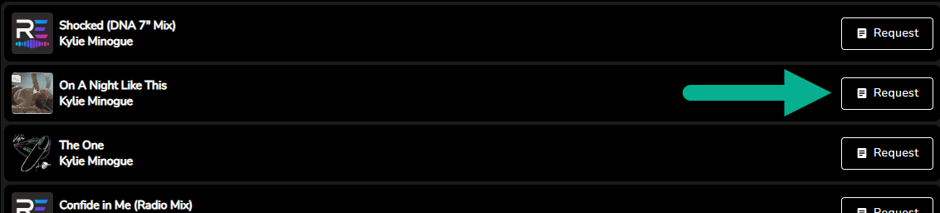
- The listener has the option to add additional information based on the Song Request Settings.
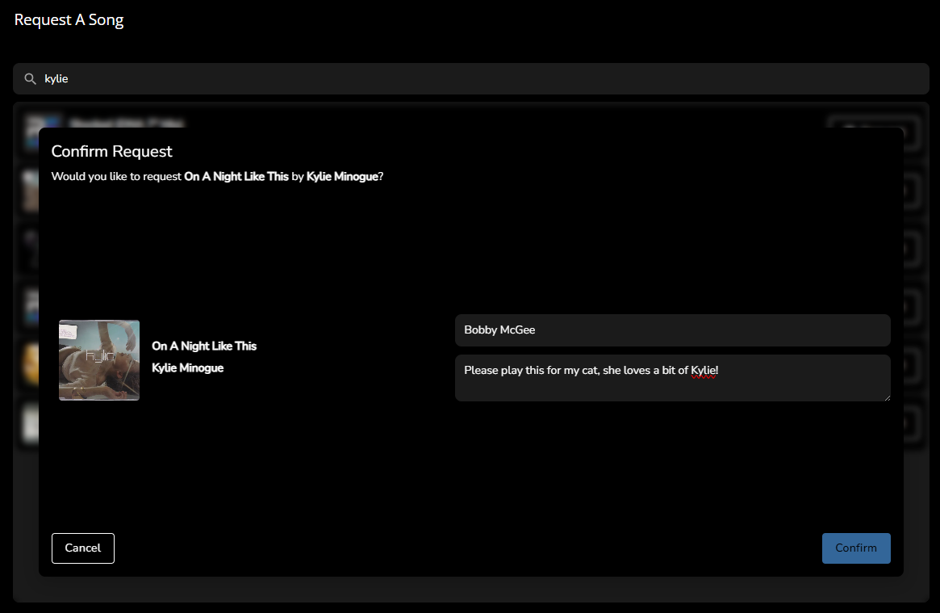
In this example we enabled the Name and Message fields, but neither were required meaning we will allow anonymous requests.
Click on Confirm to send the Song Request to the studio. - Once the request has been successfully submitted, the listener will see confirmation along with the message configured on Song Request Settings.
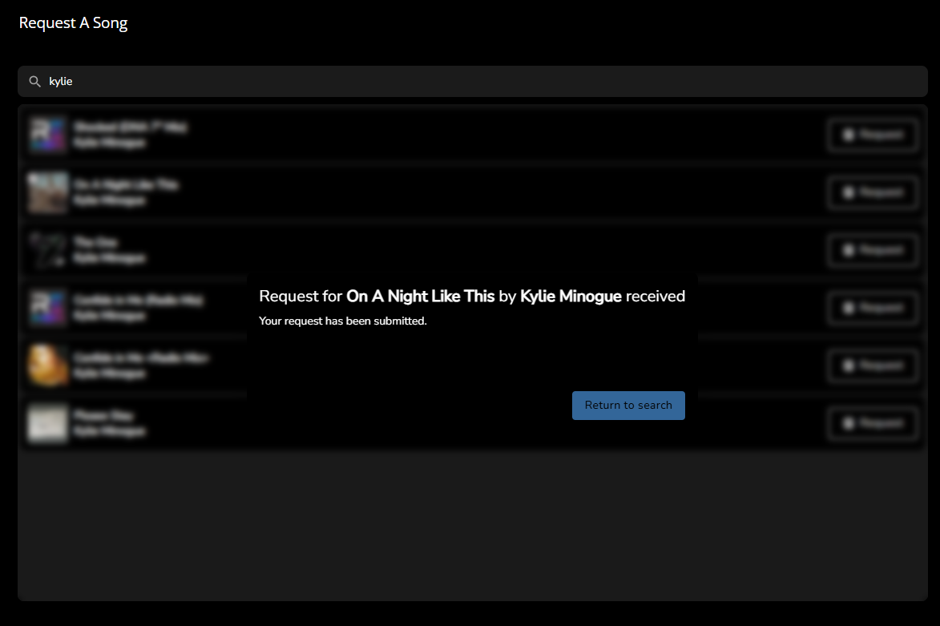
They can click on Return to search to look for another Song to request. - Now that we have a request submitted by a listener, we can focus on how we can view and use that request within Myriad Playout 7.
Using Listener Requests Within Myriad 7
Once Listener Requests start to flow into Myriad Playout 7, there are three distinct ways you can utilise them.
- Automated Placement* – Requests are automatically used to replace Songs in the Log that are marked as Requestable Songs. The Requestable status is usually set in the Clock used to schedule an hour in the Log, although, it can also be manually assigned using options in the Log. Listener comments are also added to the Log automatically.
*Please note that automatic Listener Request placement is subject to local compliancy rules and restrictions.
- Semi Automated – Request flow into a queue to be reviewed by a human. Once approved, the Requests are automatically placed in the Log when playout arrives at the next Requestable slot.
- Manual Review & Placement – Requests flow into the same queue but can be dragged into the Log (the message is also automatically added to the Log as a script). The Listener Request is then moved to the Schedule Request queue and will not be automatically placed. Requested Songs can be inserted into the Log or replace items already scheduled in the Log.
To help manage Listener Requests, there are three Listener Request queues:
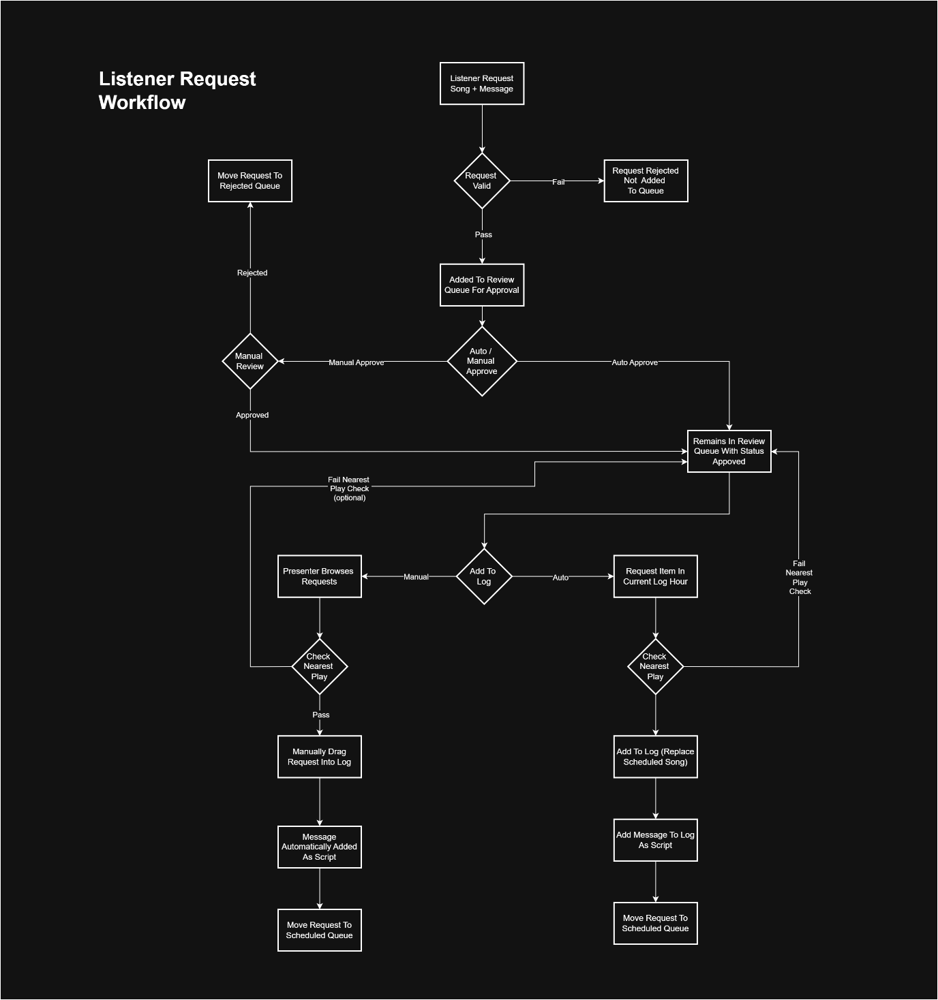
- Review Queue - All valid requests start in the Review queue regardless of approval status. If Listener Requests need to be manually approved, you can approve them inside the Approve Queue. If you have configured your system to automatically approve Listener Requests, they will be added to the Review Queue already approved. When a Listener Requested is added to the Log (either automatically or by manually dragging into the Log), it will be moved to the Scheduled Queue.
- Scheduled Queue – Once a Listener Request has been added to the Log for playout (either automatically or by a presenter manually dragging a Listener Request into the Log), the Listener Request will be moved to the Scheduled Queue and will no longer be considered for automatic placement. The Scheduled Queue also shows the date and time the Listener Request is/was scheduled for.
- Rejected Queue – Listener Requests that are manually rejected will be listed in the Rejected Queue.
- All – You can also view a combined list Requests in all queues.
Please note that Listener Requests will only be included for a configurable period set in Station Settings > Schedule Log tab.
The diagram below shows the typical workflow for Listener Requests.
Fully Automated Request Placement
In order for Listener Requests to automatically be placed in the Log, there first needs to be replaceable ‘slots’ that are used whenever a Listener Request needs to be fulfilled.
These can take the form of:
- Replaceable slots in the Clock.
- Manually mark Songs as replaceable in the Log.
Before you start, check that Automatic Approvals are turned on in your Broadcast.Radio portal.
Login to Broadcast.Radio > Settings > Listener Requests and tick the Auto-approve all requests options.
Adding Replaceable Songs To Clocks & Logs
To set Songs as replaceable items in Clocks, follow these steps:
- In Myriad Playout or Myriad Schedule, open the Station Menu > Edit Myriad Schedule Clock Assignments.
- Select a Clock Assignment grid.
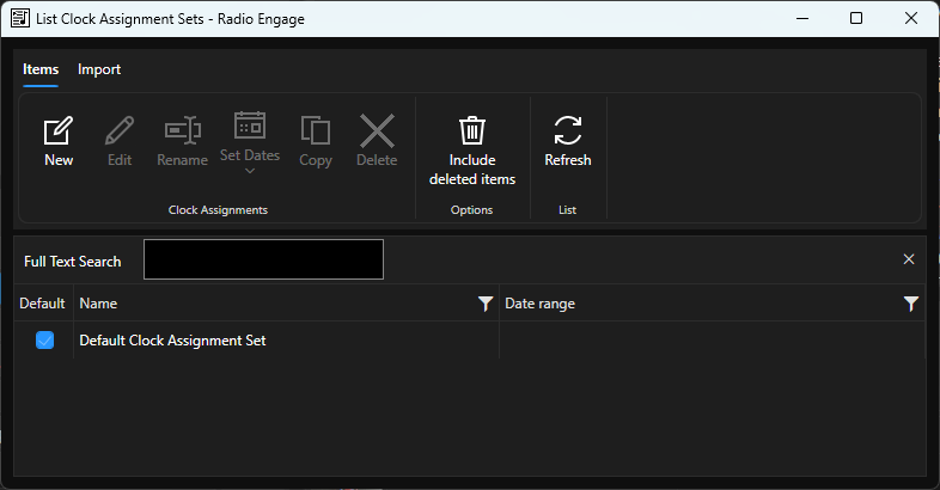
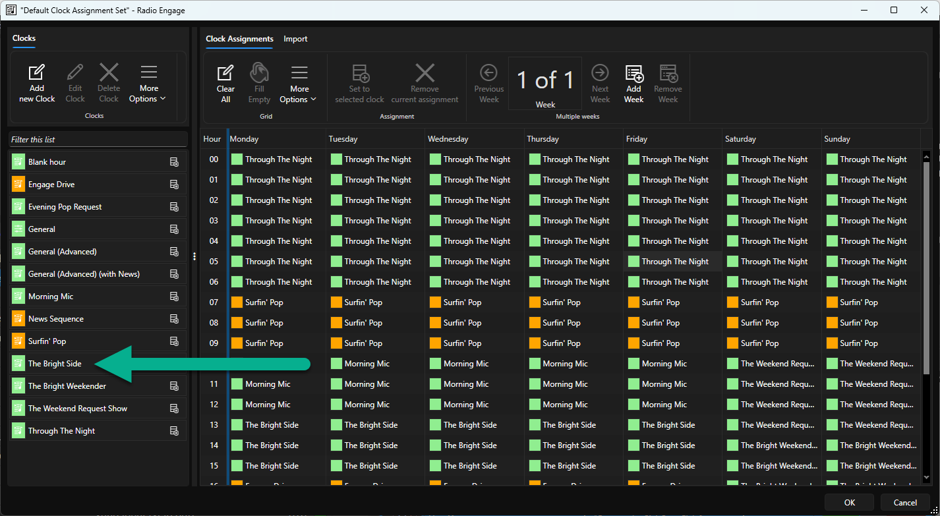
- Open a Clock listed on the left hand side by double clicking.
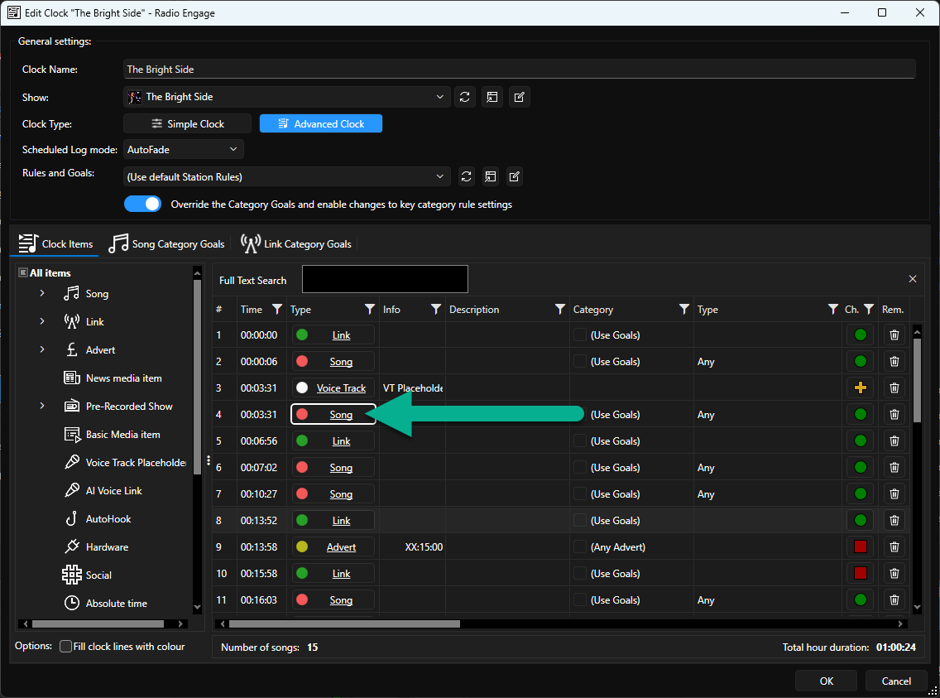
- To mark a Song Clock Item as replaceable, click the Song field in the Type column to access the settings for the Song Clock Item.
- Tick the Allow this item to be replaced with a Listener Request option.
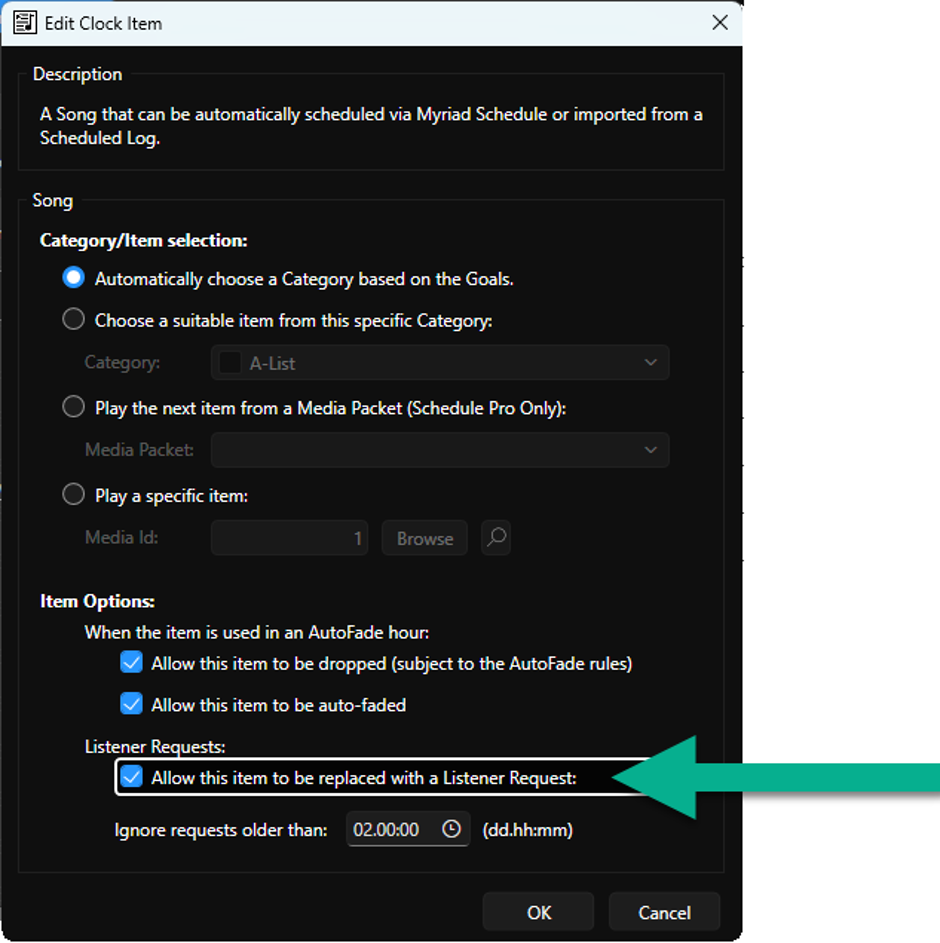
- You can also limit the time frame to consider Listener Requests for this slot in order to ignore old requests.
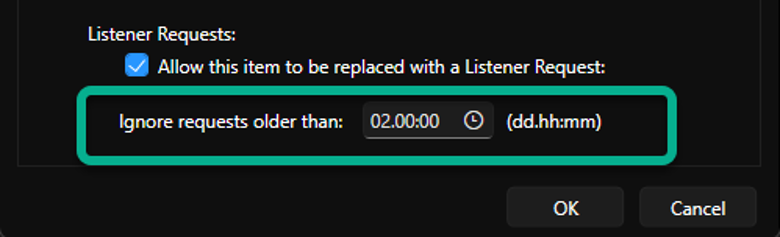
- Click on OK to save the Song Log Item settings.
- The Description field now contains a Hollow Gold Star which indicates a potentially unfulfilled Listener Request.
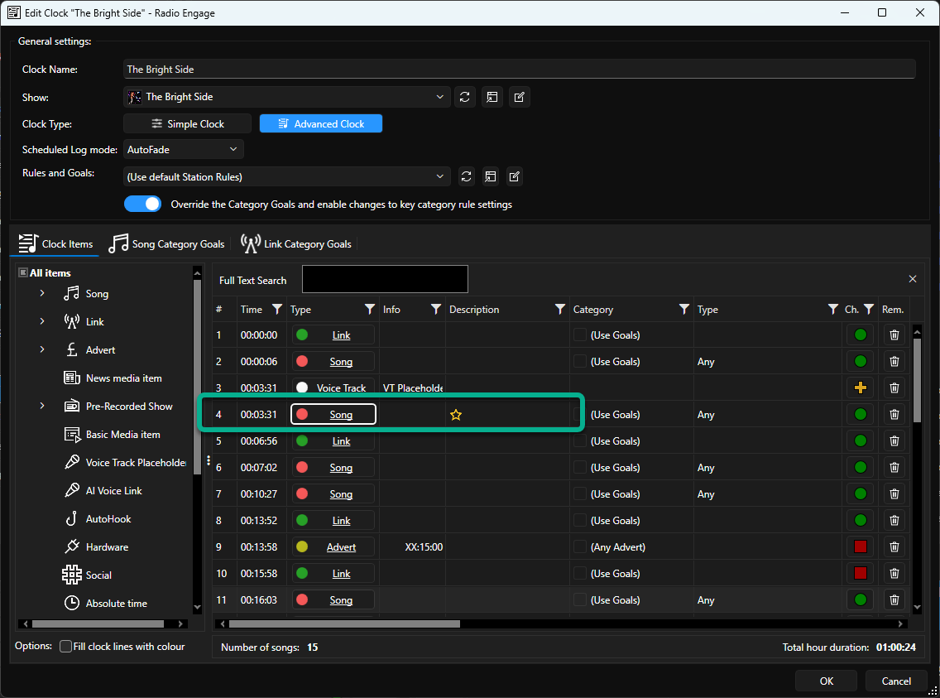
- Repeat this process for as many Song positions in the Clock as you wish.
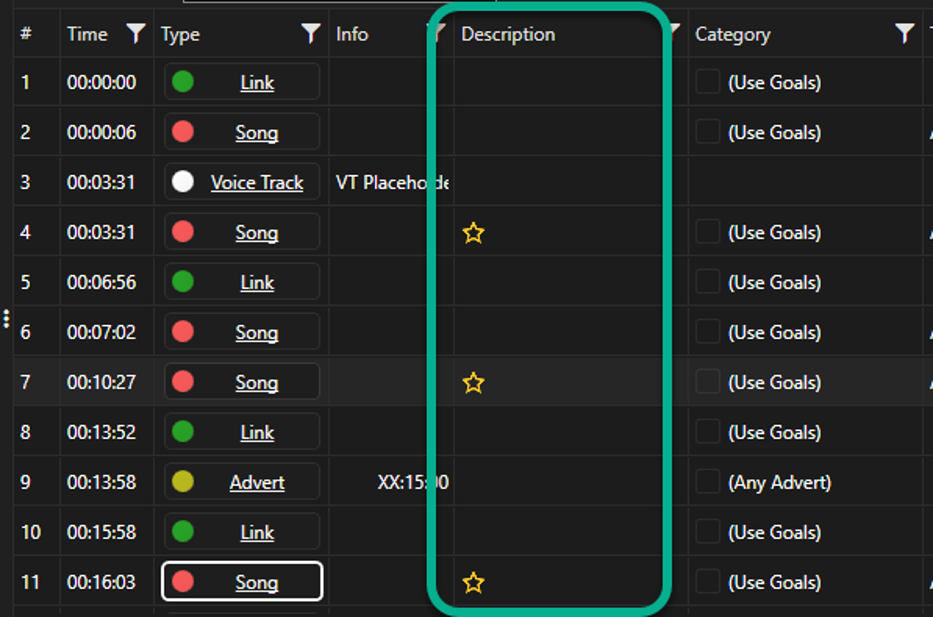
Each of these slots will be scheduled normally using the Clock Goals and Rules for any how this Clock is applied to. They will appear in the Log with the Hollow Gold Star and will be eligible to be replaced with Listener Requests.
Manually Making A Song In The Log Replaceable
You can also manually make Songs in the Log as replaceable following these steps.
Right-click on a Song in the Log.
- Expand the Listener Request menu option.
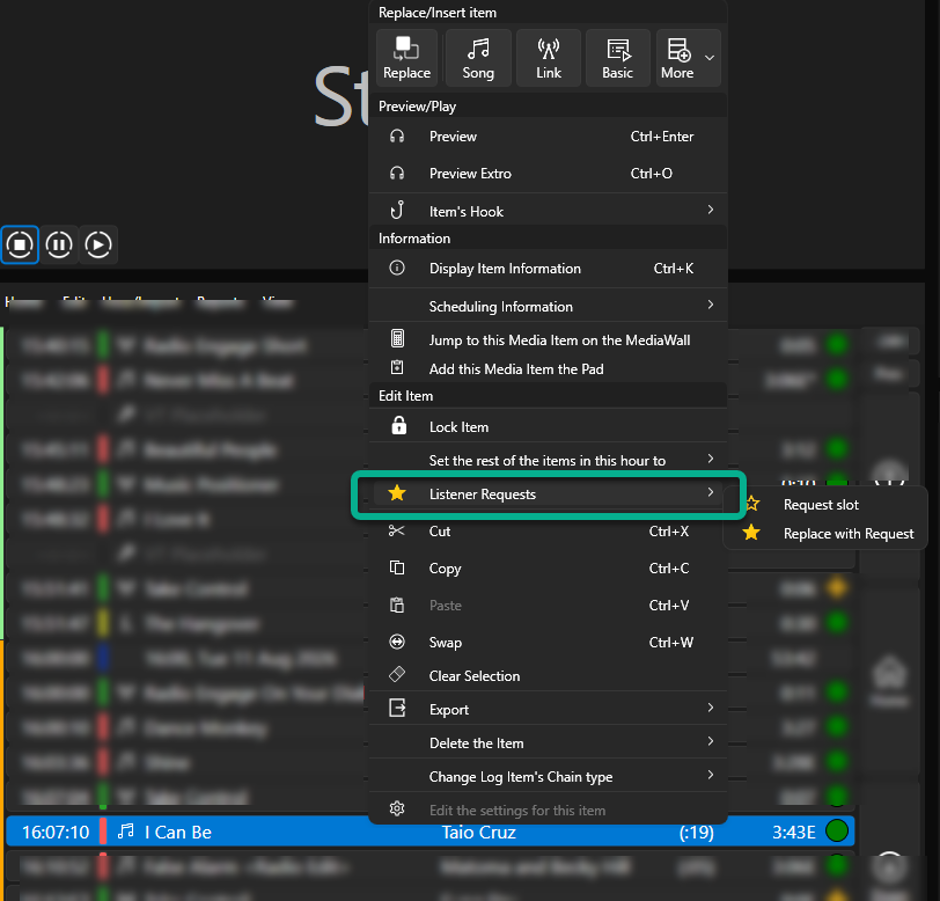
- Click on the Request Slot option.

- The Song will now have a Hollow Gold Star indicating an unfulfilled Listener Request.

- You can also use the Request button options on the Edit Tab to achieve the same.
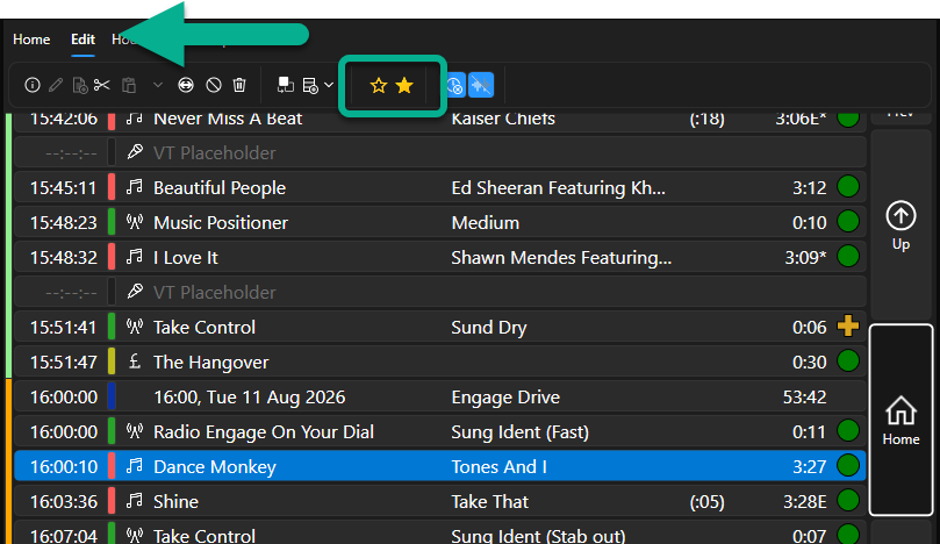
- Repeat for as many Songs in the Log as you wish.
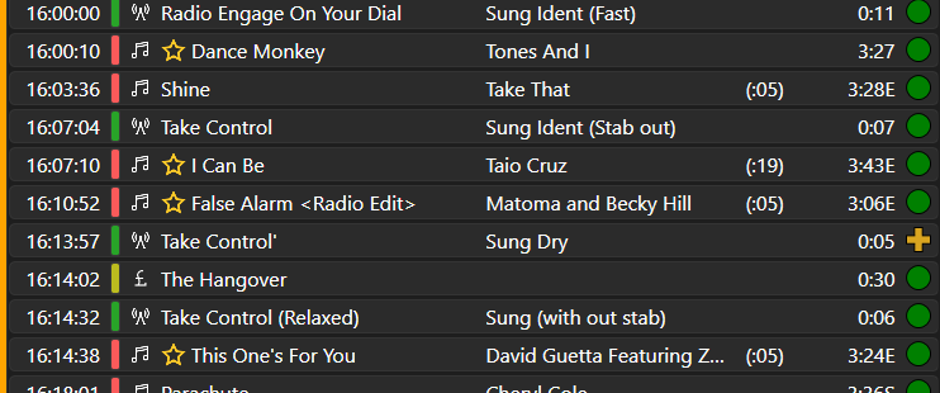
How Auto-Approved Listener Requests Are Added To The Log
With Listener Requests set to automatically be approved, requests and messages sent by listeners will automatically be added to the Review Queue with the status set to Approved.
To view the Review Queue, select a Dynamic Layout with the Listener Requests tile visible and select either the All or Review queue options.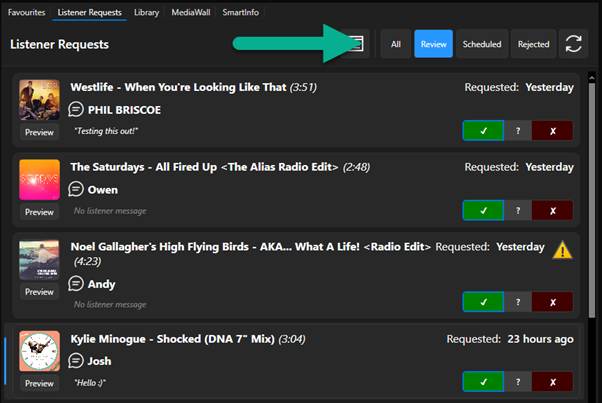
Listener Requests will be displayed in the approved status.
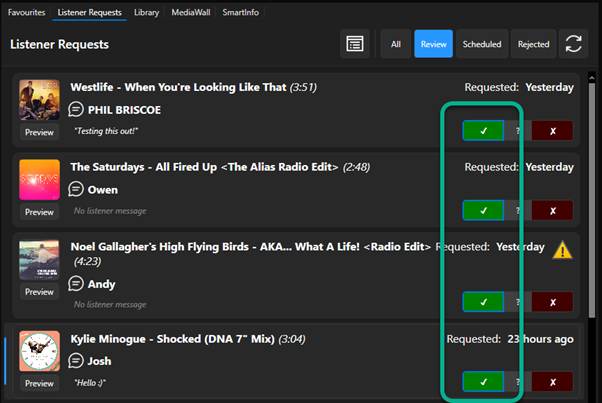
We can see in the Log, there are two replaceable Songs coming up and several Listener Requests waiting to be fulfilled .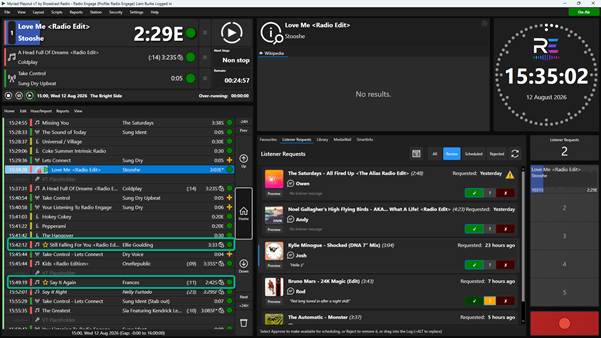
As live playout approaches the next replaceable Song, the system checks for approved Listener Requests to be placed in the Log.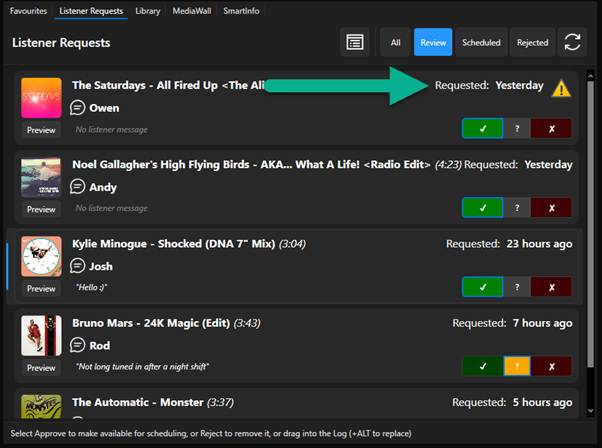
The oldest Listener Request is for ‘The Saturdays’ but we can also see the warning icon on that request. The warning icon is displayed if the Song or Artist has been played or is scheduled to be played within a configurable time span.
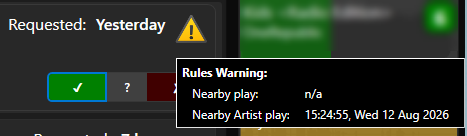
If you hover over the icon, the reason for the warning is displayed.
Because this Listener Request has a Nearby Artist warning, it is not eligible for automatic placement in the Log and will remain in the Review Queue until it is eligible to be placed or the maximum time for a Listener Request has elapsed.
Instead, the system will place the next oldest Listener Request, Noel Gallagher, into the next replaceable slot.
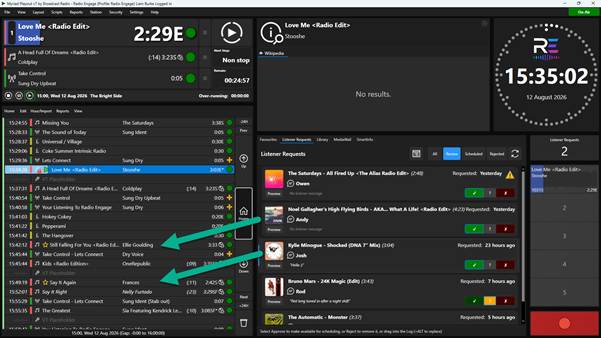
As there are two replaceable Songs in quick succession, the system will also place Kylie Minogue into the second replaceable slot.
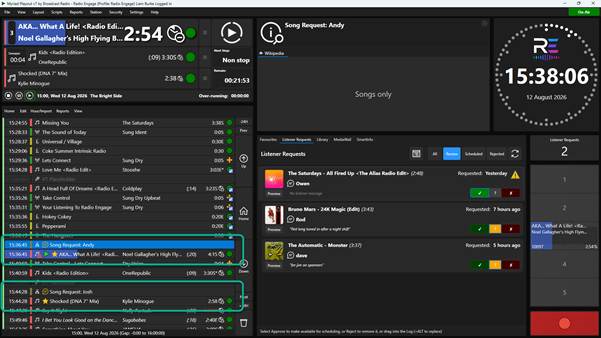
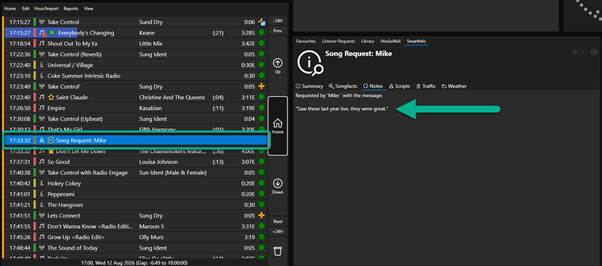
If the Listener Request includes a message from the listener, it is added to the Log as a script item which is accessible from the Notes tab on the SmartInfo tab.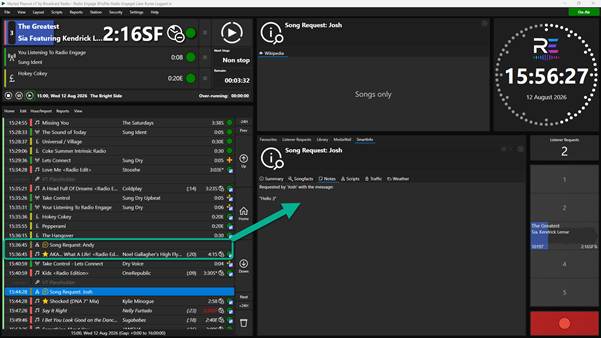
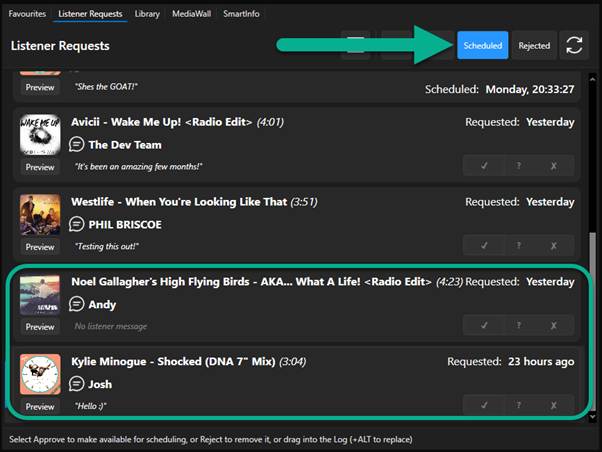
Note how the icon by the Listener Request has changed to a Filled Yellow Star indicating a Listener Request has been fulfilled.
Once the Listener Requests have been placed in the Log, they are moved from the Review queue to the Scheduled queue.
Semi-Automated Request Placement
For stations that would prefer for a human to manually review and approve Listener Requests or for stations subject to regulatory rules that may prevent automatic placement of Listener Requests, the same process as outlined above applies, with an additional step to manually approve or reject the Listener Requests.
We will not cover each step in detail as most steps are identical to the Fully Automated Request Placement outlined in the previous section.
Login to Broadcast.Radio.
Go to Settings > Myriad> Listener Requests.
Make sure the Auto Approve All Requests is unticked.
- Click on the Save button if you have made any changes.
- As Listener Requests are made, they will be listed in the Review queue in the Listener Request tile.
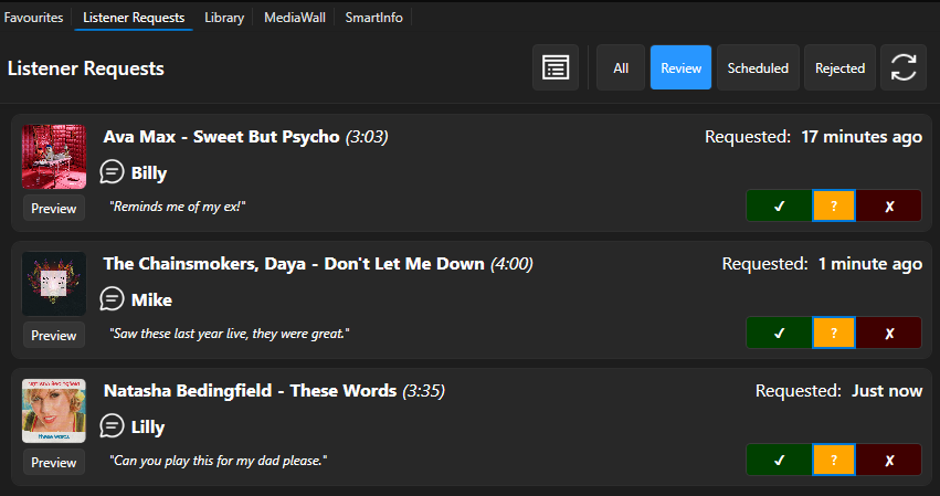
- The status of the Listener Request is indicated by the three buttons to the right.
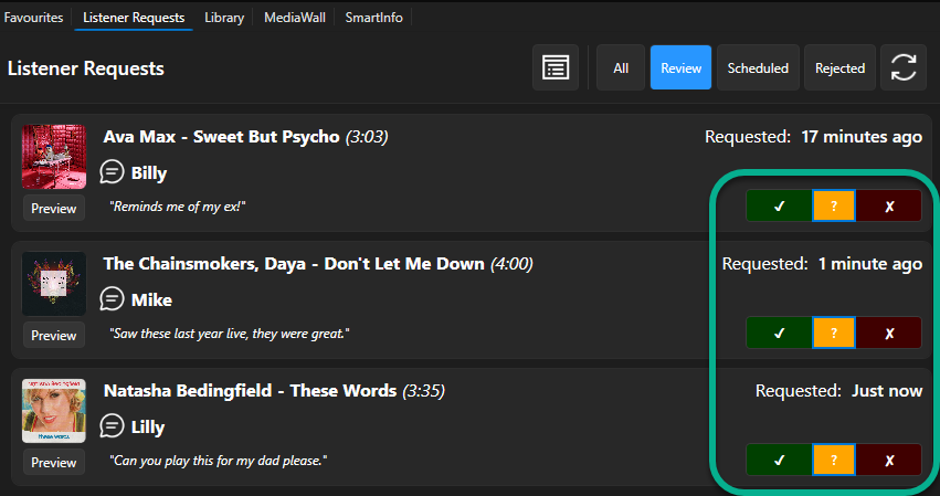
- The possible statuses are:

Needs Approval

Approved

Rejected
- To approve a Listener Request, click on Approve button.

The Listener Request will remain in the Review queue until it is automatically or manually placed in the Log at which point it will move to the Scheduled queue. - To reject a Listener Request, click on the Reject button.

The Listener Request will immediately move to the Rejected queue. - To reset a Listener Request to ‘Need Approval’, click on the ‘?’ button.

The Listener Request will immediately move to the Review queue. - Approved Listener Requests will either be automatically placed in the Log as the playout encounters Log items listed as replaceable.

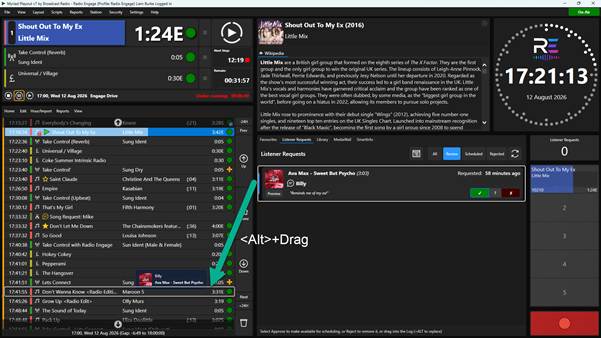
- Presenters can also manually insert Listener Requests into the Log by dragging from the Listener Request tile to the Log. To replace a Log item with a Listener Request use <Alt>+Drag to drag from the Listener Request tile to the Log.
Manually Inserting Listener Requests Into The Log
Finally, you can manually insert Listener Requests directly into the Log or replace Log items with Listener Requests.
Please note that Listener Requests do not need to be approved to be manually placed in the Log.
The Nearest Play warning is also only an advisory when manually placing Listener Requests.
To insert a Listener Request into the Log, simply drag from the Listener Request tile to the position in the Log you wish to insert into.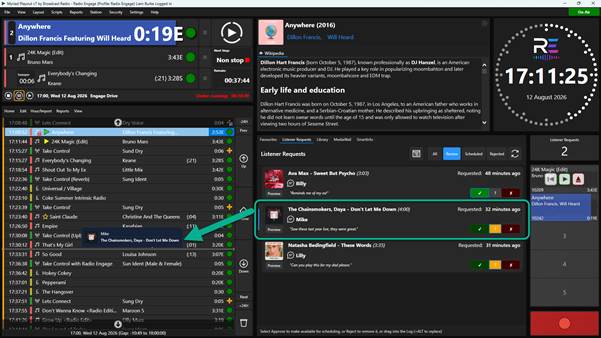
The Listener Request will be inserted into the Log along with any associated message from the Listener.

The Listener Request will be moved from the Review queue to the Scheduled queue.
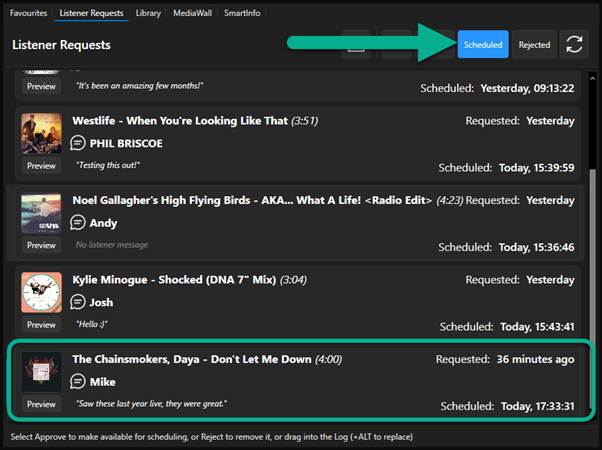
You can access the Listener Message via the Notes tab on the Smart Info tile.
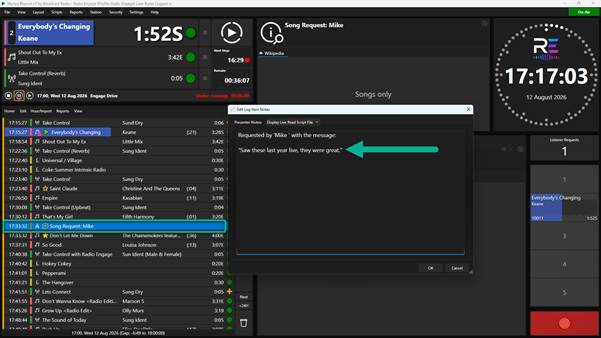
You can also access the Listener Message by double clicking on the Script item in the Log to open the Message in the Scripts window.
If you want to replace a Log item with a Listener Request. Hold down the <Alt> key and drag the Listener Request into the Log.
A box will appear around the Log Item you are going to replace.
Alternatively, you can right-click on a Log item and select Listener Requests > Replace with Request from the right-click menu.
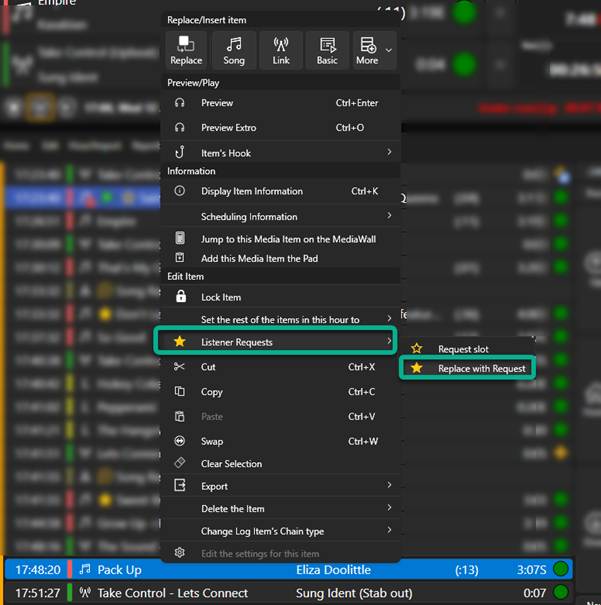
This will open a pop-up window allowing you to access your Listener Request queues and select the Listener Request you want to use.
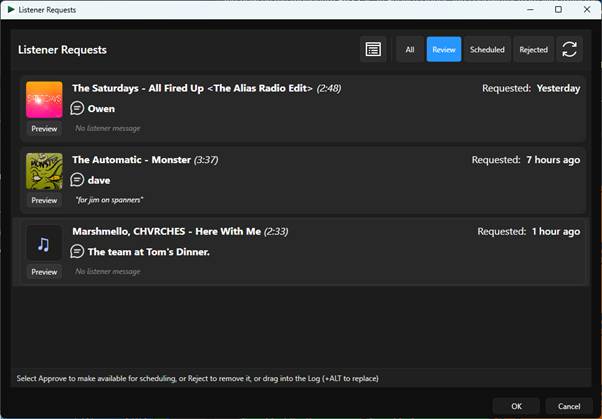
The original Log Item will be replaced with the Listener Request and associated Listener Message if there is one.
Mix & Match
You don't need to pick a single workflow for Listener Requests. Feel free to mix automated or semi-automated placement with manual placement, to get the most from your listener engagement.
Was this article helpful?
That’s Great!
Thank you for your feedback
Sorry! We couldn't be helpful
Thank you for your feedback
Feedback sent
We appreciate your effort and will try to fix the article